550 lines
20 KiB
Markdown
550 lines
20 KiB
Markdown
# browser_mod
|
|
|
|
[](https://github.com/custom-components/hacs)
|
|
|
|
A Home Assistant integration to turn your browser into a controllable entity - and also an audio player and a security camera (WIP).
|
|
|
|
## Example uses
|
|
|
|
- Make the camera feed from your front door pop up on the tablet in your kitchen when someone rings the doorbell.
|
|
- Have a message pop up on every screen in the house when it's bedtime.
|
|
- Make the browser on your workstation switch to a specific tab when the kitchen light is on after midnight
|
|
- Play a TTS message on your work computer when the traffic sensor tells you it's time to go home.
|
|
- Display a full screen clock on your screen if no one's touched it for five minutes
|
|
|
|
For more usage examples, see the [cookbook](https://github.com/thomasloven/hass-browser_mod/wiki/Cookbook).
|
|
|
|
# Installation instructions
|
|
|
|
- Copy the contents of `custom_components/browser_mod/` to `<your config dir>/custom_components/browser_mod/`.
|
|
|
|
- Add the following to your `configuration.yaml`:
|
|
|
|
```yaml
|
|
browser_mod:
|
|
```
|
|
|
|
- Restart Home Assistant
|
|
|
|
> Note: If you want to use browser_mod with Home Assistant Cast, you need to also add:
|
|
>
|
|
> ```yaml
|
|
> resources:
|
|
> - url: /browser_mod.js
|
|
> type: module
|
|
> ```
|
|
>
|
|
> to your `ui_lovelace.yaml`.
|
|
> Don't worry about where to put browser_mod.js, the integration will handle that automatically, and please note that it's **not** `/local/browser_mod.js`.
|
|
|
|
# Usage
|
|
|
|
Here's a fantastic video summary of all `browser_mod` functions by Pinkywafer: [Youtube link](https://www.youtube.com/watch?v=atpIP2RYldA).
|
|
|
|
## Devices
|
|
|
|
The most important concept of `browser_mod` is the _device_.
|
|
|
|
A _device_ is a machine-browser combination identified by a unique `deviceID`. The `deviceID` is randomly generated and may look like `ded3b4dc-abedd098`.
|
|
|
|
- Chrome on your desktop and Chrome on your laptop are two different _devices_.
|
|
- Chrome on your laptop and Safari on your laptop are two different _devices_.
|
|
- Two tabs in Firefox on the same computer is one _device_.
|
|
- Two windows in Edge on the same computer is one _device_.
|
|
|
|
In the two latter cases, the last loaded tab/window will be the _active_ one.
|
|
|
|
Note: Incognito mode will generate a new `deviceID` and thus a new _device_ every time it's started.
|
|
|
|
### Aliases
|
|
|
|
Since the deviceID can be a bit hard to remember for devices you use often, you can specify an alias in `configuration.yaml`
|
|
|
|
```yaml
|
|
browser_mod:
|
|
devices:
|
|
99980b13-dabc9563:
|
|
name: arrakis
|
|
d2fc860c-16379d23:
|
|
name: dashboard
|
|
```
|
|
|
|
This binds the _aliases_ `arrakis` to `99980b13-dabc9563` and `dashboard` to `d2fc860c-16379d23`.
|
|
|
|
Note: Aliases must be unique.
|
|
|
|
#### Changing deviceID
|
|
|
|
You can change the deviceID of your device by adding a `browser-player` card to your lovelace interface and clicking the deviceID at the bottom of the card. Set it to `clear` to generate a new random one.
|
|
|
|
You can also set a deviceID by adding `?deviceID=mydeviceID` to the end of the URL you're using to access Home Assistant. Be careful - I have no idea what could happen if several devices were to have the same ID.
|
|
Use `?deviceID=clear` to generate a new random one.
|
|
|
|
**Take care to avoid deviceID collissions. There's no telling what could happen if more devices share the same ID.**
|
|
|
|
### Prefix
|
|
|
|
You can add a custom prefix to all entity ids in `configuration.yaml`:
|
|
|
|
E.g. to give entities default names like `media_player.browser_99980b13_dabc9563` add:
|
|
|
|
```yaml
|
|
browser_mod:
|
|
prefix: "browser_"
|
|
```
|
|
|
|
This does not apply to devices with an alias.
|
|
|
|
### Disabling entities
|
|
|
|
`browser_mod` creates a number of entities, which is explained below. In some cases, you may not want to do that. If so, add a list of entity types you do _not_ want to add to a `disable` section, either for each device, or globally to ignore for all unknown devices:
|
|
|
|
E.g. to disable the `light` and `media_player` for the device aliased to `arrakis`, AND disable _all_ entities for all devices which _don't_ have an alias:
|
|
|
|
```yaml
|
|
browser_mod:
|
|
devices:
|
|
99980b13-dabc9563:
|
|
name: arrakis
|
|
disable:
|
|
- light
|
|
- media_player
|
|
disable:
|
|
- all
|
|
```
|
|
|
|
## Entities
|
|
|
|
Once `browser_mod` is installed, loading up your Home Assistant frontend on a new _device_ will create three to five new devices.
|
|
|
|
- `sensor.<device>`
|
|
- `media_player.<device>`
|
|
- `light.<device>`
|
|
- If you've enabled it: `camera.<device>`
|
|
- If you're using Fully Kiosk Browser: `binary_sensor.<device>`
|
|
|
|
`<device>` here will be the `deviceID` of the _device_ but with the dash (`-`) replaced by an underscore (`_`). If you've defined an alias, it will be that instead.
|
|
|
|
E.g:
|
|
Connecting your phone with `deviceID: ded3b4dc-abedd098` will create the entities `sensor.ded3b4dc_abedd098`, `media_player.ded3b4dc_abedd098` and `light.ded3b4dc_abedd098`.
|
|
Connecting with the computer named `Arrakis` above with `deviceID: 99980b13-dabc9563` will create the entities `sensor.arrakis`, `media_player.arrakis` and `light.arrakis`.
|
|
|
|
### sensor
|
|
|
|
The `sensor` will display the number of connected views (tabs/windows) of the device. Note that using multiple view isn't really recommended, and any action targeting a device will happen in the last loaded view.
|
|
|
|
The sensor also has the following attributes:
|
|
|
|
| attribute | content |
|
|
| --------------- | ------------------------------------------------------------------- |
|
|
| `type` | `browser_mod` |
|
|
| `last_seen` | The time when the _device_ was last seen |
|
|
| `deviceID` | The deviceID of the _device_. |
|
|
| `path` | The currently displayed path on the _device_. |
|
|
| `visibility` | Whether the frontend is currently visible on the _device_. |
|
|
| `userAgent` | The User Agent of the associated browser. |
|
|
| `currentUser` | The user currently logged in on the _device_. |
|
|
| `fullyKiosk` | True if the _device_ is a Fully Kiosk browser. Undefined otherwise. |
|
|
| `width` | The current width of the browser window in pixels. |
|
|
| `height` | The current height of the browser window in pixels. |
|
|
| `battery_level` | The current battery level of your device - if supported |
|
|
| `charging` | The current charging state of your device - if supported |
|
|
|
|
### media_player
|
|
|
|
The `media_player` can be used to play sounds on the _device_.
|
|
|
|
**NOTE: Because Apple is Apple; on iOS you need to touch the screen once after loading the frontend before any playback will work.**
|
|
|
|
### light
|
|
|
|
The `light` can be used to blackout the screen.
|
|
For Fully Kiosk Browser, the screen will actually turn off.
|
|
For other browsers, the interface will just be covered with black (the screen is still on, will have a visible glow in the dark, and you won't save any battery).
|
|
|
|
### camera
|
|
|
|
For security and UX reasons, the camera must be enabled manually on a device by device basis.
|
|
|
|
Enabling the camera is done by adding `camera: true` to the devices configuration in `configuration.yaml`:
|
|
|
|
```yaml
|
|
browser_mod:
|
|
devices:
|
|
99980b13-dabc9563:
|
|
name: arrakis
|
|
camera: true
|
|
d2fc860c-16379d23:
|
|
name: dashboard
|
|
```
|
|
|
|
After restarting Home Assistant (and [clearing cache](https://github.com/thomasloven/hass-config/wiki/Lovelace-Plugins#clearing-cache)), the next time you load your interface your browser will ask you if you want Home Assistant to be able to access your camera. Some browsers (e.g. mobile Safari) will ask every time you make a hard refresh.
|
|
|
|
Be aware that keeping the camera on may make your device run hot and drain your battery.
|
|
|
|
The camera does not work well with Fully Kiosk Browser. If you're using FKB, use the built-in camera functionality instead. It's better in every way.
|
|
|
|
### binary_sensor
|
|
|
|
The `binary_sensor` will only be available for Fully Kiosk Browser PRO _devices_.
|
|
It's state will be the state of the camera motion detector of the _device_ (5 second cooldown).
|
|
|
|
## Services
|
|
|
|
`browser_mod` registers a number of services.
|
|
|
|
All service calls have one parameter in common; `deviceID` which is a list of _devices_ to execute the comand on. If `deviceID` is omitted, the command will be executed on **all** currently connected _devices_. `deviceID` may also contain aliases.
|
|
|
|
You can also activate any service from the frontend by using the `fire-dom-event` `tap_action`.
|
|
|
|
### - debug
|
|
|
|
```yaml
|
|
service: browser_mod.debug
|
|
```
|
|
|
|
Display a popup with the deviceID _and_ a javascript alert with the deviceID on all connected _devices_.
|
|
|
|
### - set_theme
|
|
|
|
```yaml
|
|
service: browser_mod.set_theme
|
|
data:
|
|
theme: clear_light
|
|
```
|
|
|
|
will set the current theme to `clear_light` on all devices.
|
|
|
|
### - navigate
|
|
|
|
```yaml
|
|
service: browser_mod.navigate
|
|
data:
|
|
navigation_path: /lovelace/1
|
|
deviceID:
|
|
- ded3b4dc-abedd098
|
|
```
|
|
|
|
will open your second lovelace view on just the _device_ `ded3b4dc-abedd098`.
|
|
|
|
Note: `navigation_path` does not have to be a lovelace path. All paths in Home Assistant works. (E.g. `/states`, `/dev-info`, `/map`)
|
|
|
|
### - more_info
|
|
|
|
```yaml
|
|
service: browser_mod.more_info
|
|
data:
|
|
entity_id: camera.front_door
|
|
deviceID:
|
|
- ded3b4dc-abedd098
|
|
- dashboard
|
|
```
|
|
|
|
will show the more-info dialog of `camera.front_door` on the _devices_ `ded3b4dc-abedd098` and `dashboard`.
|
|
|
|
The optional parameter `large: true` will make the popup wider.
|
|
|
|
### - toast
|
|
|
|
```yaml
|
|
service: browser_mod.toast
|
|
data:
|
|
message: Short message
|
|
```
|
|
|
|
Display a toast notification on all devices.
|
|
The optional parameter `duration:` determines the time (in ms) that the toast is shown. Set to 0 for persistent display. Default is 3000.
|
|
|
|
### - popup
|
|
|
|
```yaml
|
|
service: browser_mod.popup
|
|
data:
|
|
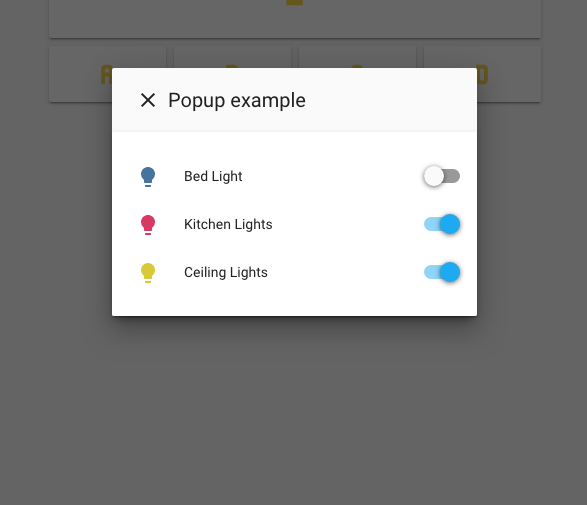
title: Popup example
|
|
card:
|
|
type: entities
|
|
entities:
|
|
- light.bed_light
|
|
- light.kitchen_lights
|
|
- light.ceiling_lights
|
|
deviceID:
|
|
- this
|
|
- dashboard
|
|
```
|
|
|
|
will display the specified `entities` card as a popup on the current device and on `dashboard`
|
|
|
|
|
|
|
|
The optional parameter `large: true` will make the popup wider.
|
|
The optional parameter `hide_header: true` will hide the header bar and close button.
|
|
The optional parameter `auto_close: true` will make the popup close automatically when the mouse is moved or a key is pressed on the keyboard. This also removes the header bar.
|
|
The optional parameter `time:` (only useable if `auto_close: true` is also set) will turn the popup into a "screensaver". See the `blackout` command below.
|
|
|
|
If [card-mod](https://github.com/thomasloven/lovelace-card-mod) is installed, the popup can be styled by the optional `style` parameter, or by the `card-mod-more-info[-yaml]` theme variable.
|
|
|
|
### - close_popup
|
|
|
|
```yaml
|
|
service: browser_mod.close_popup
|
|
```
|
|
|
|
will close all more-info dialogs and popups that are open on all connected _devices_.
|
|
|
|
### - blackout
|
|
|
|
```yaml
|
|
service: browser_mod.blackout
|
|
data:
|
|
deviceID: this
|
|
```
|
|
|
|
Will cover the entire window (or screen if in full screen mode) with black on the current device.
|
|
Moving the mouse, touching the screen or pressing any key will restore the view.
|
|
|
|
The optional parameter `time:` will make the blackout turn on automatically after the specified number of seconds. It works kind of like a screensaver and will keep turning on until `blackout` is called again with `time: -1`.
|
|
|
|
Note: This will _not_ turn off your screen backlight. Most screens will still emit light in a dark room.
|
|
|
|
### - no_blackout
|
|
|
|
```yaml
|
|
service: browser_mod.no_blackout
|
|
```
|
|
|
|
Remove a blackout.
|
|
The optional parameter `brightness` will set the screen brightness of a device running Fully Kiosk Browser to a value between 0 and 255.
|
|
|
|
### - lovelace_reload
|
|
|
|
```yaml
|
|
service: browser_mod.lovelace_reload
|
|
```
|
|
|
|
Refreshes the lovelace config. Same as clicking "Refresh" in the top right menu in lovelace.
|
|
|
|
### - window_reload
|
|
|
|
```yaml
|
|
service: browser_mod.window_reload
|
|
```
|
|
|
|
Forces the browser to reload the page. Same as clicking your browsers refresh button.
|
|
|
|
### - command
|
|
|
|
```yaml
|
|
service: browser_mod.command
|
|
data:
|
|
command: <command>
|
|
<data>
|
|
```
|
|
|
|
This can be used to send any command to a _device_ by setting `command:` to the service name and appending any other options.
|
|
E.g. the following two service calls will perform the same function:
|
|
|
|
```yaml
|
|
service: browser_mod.command
|
|
data:
|
|
command: toast
|
|
message: Hello World!
|
|
|
|
service: browser_mod.toast
|
|
data:
|
|
message: Hello World!
|
|
```
|
|
|
|
### - commands
|
|
|
|
```yaml
|
|
service: browser_mod.commands
|
|
data:
|
|
commands:
|
|
- command: <command>
|
|
<data>
|
|
- command: <command>
|
|
<data>
|
|
```
|
|
|
|
This service can be used to call several services listed in the `commands:` parameter consecutively.
|
|
|
|
### - delay
|
|
|
|
```yaml
|
|
service: browser_mod.delay
|
|
data:
|
|
seconds: <seconds>
|
|
```
|
|
|
|
Do nothing for `<seconds>` seconds.
|
|
|
|
## Run a command from the frontend
|
|
|
|
To run a command from the frontend, you can use the tap_action `fire-dom-event` with a `browser_mod` parameter.
|
|
E.g:
|
|
|
|
```yaml
|
|
type: button
|
|
icon: mdi:star
|
|
tap_action:
|
|
action: fire-dom-event
|
|
browser_mod:
|
|
command: toast
|
|
message: Hello, world!
|
|
```
|
|
|
|
There's also a special command which is only useful from the frontend:
|
|
|
|
### - call_service
|
|
|
|
```yaml
|
|
command: call-service:
|
|
service: <service>
|
|
service_data:
|
|
<service_data>
|
|
```
|
|
<<<<<<< HEAD
|
|
This works exactly like a `call_service` tap_action, but if `service_data` contains the parameter `deviceID` and that contains the word `this`, that will be replaced with the current device's deviceID.
|
|
=======
|
|
|
|
This works exactly like a `call_service` tap_action, but if `service_data` contains the parameter `deviceID` and that contains the word `this`, that will be replaced with the current deviced deviceID.
|
|
>>>>>>> Code linting
|
|
This may be useful for e.g. calling scripts if you want to know from where it was triggered.
|
|
|
|
# `browser-player` card
|
|
|
|
To control the playback in the current _device_, `browser_mod` includes a custom lovelace card. Just add
|
|
|
|
```yaml
|
|
type: custom:browser-player
|
|
```
|
|
|
|
anywhere in your lovelace configuration.
|
|
|
|
The player card also displays the `entityID`. Click it to select, so you can copy it.
|
|
|
|

|
|
|
|
# Fully Kiosk Browser
|
|
|
|
If you are using a device running [Fully Kiosk Browser](https://www.ozerov.de/fully-kiosk-browser/) (PLUS version only) you will have access to a few more functions.
|
|
|
|
For this to work you need to activate `Settings->Advanced Web Settings->Javascript Interface (PLUS)` and `Settings->Motion Detection (PLUS)->Enable Visual Motion Detection`.
|
|
|
|
First of all the commands `blackout` and `no-blackout` will control the devices screen directly.
|
|
`no-blackout` also has an optional parameter `brightness` that can set the screen brightness between 0 and 255.
|
|
|
|
Second, there are a few more attributes available
|
|
|
|
| attribute | content |
|
|
| --------------- | ---------------------------------------------------------------------------- |
|
|
| `fullyKiosk` | True. |
|
|
| `brightness` | The current screen brightness. |
|
|
| `battery_level` | The current charge percentage of the devices battery. |
|
|
| `charging` | Whether the battery is currently charging. |
|
|
| `motion` | Whether the devices camera has detected any motion in the last five seconds. |
|
|
|
|
# Replacing more-info dialogs
|
|
|
|
With browser_mod, you can replace any more-info dialog with any lovelace card you choose yourself. This can be done either per lovelace view, or globally (even outside of lovelace).
|
|
|
|
The replacement is included in your lovelace or lovelace view configuration, and the syntax is exactly like the `popup` service, except you can't use `auto_close` or `time`.
|
|
|
|
Ex:
|
|
|
|
```yaml
|
|
views:
|
|
- title: Home view
|
|
icon: mdi:house
|
|
popup_cards:
|
|
light.ceiling_light:
|
|
title: My popup
|
|
card:
|
|
type: entities
|
|
entities:
|
|
- light.ceiling_light_bulb1
|
|
- light.ceiling_light_bulb2
|
|
- light.ceiling_light_bulb3
|
|
- light.ceiling_light_bulb4
|
|
```
|
|
|
|
This would show an entities card with four bulbs any time the more-info dialog for `light.ceiling_light` would normally be shown when you're on the Home view in lovelace.
|
|
|
|
```yaml
|
|
title: My home
|
|
resources:
|
|
- url: /local/card-mod.js
|
|
type: module
|
|
popup_cards:
|
|
sensor.sensor1:
|
|
title: First sensor
|
|
card:
|
|
type: gauge
|
|
entity: sensor.sensor1
|
|
sensor.sensor2:
|
|
title: Second sensor
|
|
card:
|
|
type: gauge
|
|
entity: sensor.sensor2
|
|
```
|
|
|
|
This would replace the more-info dialogs of `sensor.sensor1` and `sensor.sensor2` anywhere in your interface. Even outside of lovelace - be careful about that.
|
|
|
|
# Support
|
|
|
|
[Home Assistant community forum thread](https://community.home-assistant.io/t/browser-mod-turn-your-browser-into-a-controllable-device-and-a-media-player/123806)
|
|
|
|
# FAQ
|
|
|
|
### Where can I find my deviceID?
|
|
|
|
The easiest way is to go to `/developer-tools/service` and call the `browser_mod.debug` service.
|
|
|
|
But you can also find the device id on the `browser-player` card, if you added one to your lovelace config.
|
|
|
|
An alternative way is to type `localStorage["lovelace-player-device-id"]` into your browsers console.
|
|
|
|
### Does this replace lovelace-player and lovelace-browser-commander
|
|
|
|
Yes.
|
|
|
|
Some improvements
|
|
|
|
- With the backend support `browser_mod` does the same things as both of those, but better.
|
|
- Since `browser_mod` uses a service for executing commands rather than events, the commands can be easily triggered by any lovelace element which has a `tap_action` setting.
|
|
This actually means it pretty much replaces `popup-card` as well.
|
|
- `browser_mod` uses websockets to get immediate feedback from the _device_ to the backend and much better tracking of disconnects.
|
|
- _Aliases_. 'nuff said.
|
|
- `browser_mod` works outside of `/lovelace`.
|
|
- This works even if the currently logged in user is not in the admin group.
|
|
|
|
### Does this replace lovelace-fullykiosk
|
|
|
|
Yes. You need the paid version, btw.
|
|
|
|
### Can the deviceID be used to track me across the internet
|
|
|
|
No\*. The device is stored in your browsers localStorage - a data store which is sandboxed only to Home Assistant. That means only Home Assistant can access it. Furthermore, different Home Assistant installations cannot acces each others localStorage.
|
|
|
|
Some of [my lovelace plugins](https://github.com/thomasloven/hass-config/wiki/My-Lovelace-Plugins) use the device to do different things for different _devices_.
|
|
|
|
> _\*There is one exception. If you are using [Fully Kiosk Browser](https://www.ozerov.de/fully-kiosk-browser/), the deviceID is taken from the browser instead of being randomly generated. This deviceID will be the same for each website that asks for it._
|
|
|
|
### My Fully Kiosk Browser device goes unavailable after the screen has been turned off for five minutes
|
|
|
|
This seems to be a problem with Android, and not much to do about it.
|
|
As a workaround you can add the following to your configuration:
|
|
|
|
```yaml
|
|
browser_mod:
|
|
devices:
|
|
d2fc860c-16379d23: # DeviceID of your FKB device
|
|
force_stay_awake: true
|
|
```
|
|
|
|
That will make the screen turn on and off again for a second regularly to stop the five minute timer from running out.
|
|
|
|
---
|
|
|
|
<a href="https://www.buymeacoffee.com/uqD6KHCdJ" target="_blank"><img src="https://www.buymeacoffee.com/assets/img/custom_images/white_img.png" alt="Buy Me A Coffee" style="height: auto !important;width: auto !important;" ></a>
|