412 lines
15 KiB
Markdown
412 lines
15 KiB
Markdown
# browser_mod 2.0
|
|
|
|
# Installation instructions
|
|
|
|
- **First make sure you have completely removed any installation of Browser Mod 1**
|
|
|
|
- Either
|
|
|
|
- ~~Find and install Browser Mod under `integrations`in [HACS](https://hacs.xyz)~~
|
|
- OR copy the contents of `custom_components/browser_mod/` to `<your config dir>/custom_components/browser_mod/`.
|
|
|
|
- Restart Home Assistant
|
|
|
|
- Add the "Browser Mod" integration in Settings -> Devices & Services -> Add Integration or click this button: [](https://my.home-assistant.io/redirect/config_flow_start/?domain=browser_mod)
|
|
|
|
- Restart Home Assistant
|
|
|
|
# Browser Mod Panel
|
|
|
|
When you're logged in as an administrator you should see a new panel called _Browser Mod_ in the sidebar. This is where you controll any Browser Mod settings.
|
|
|
|
## This browser
|
|
|
|
A basic concept for Browser Mod is the _Browser_. A _Browser_ is identified by a unique `BrowserID` stored in the browsers [LocalStorage](https://developer.mozilla.org/en-US/docs/Web/API/Web_Storage_API).
|
|
|
|
Browser Mod will initially assigning a random `BrowserID` to each _Browser_ that connects, but you can change this if you want.
|
|
|
|
LocalStorage works basically like cookies in that the information is stored locally on your device. Unlike a cookie, though, the information is bound to a URL. Therefore you may get different `BrowserID`s in the same browser if you e.g. access Home Assistant through different URLs inside and outside of your LAN, or through Home Assistant Cloud.
|
|
|
|
### Register
|
|
|
|
Registering a _Browser_ as a device will create a Home Assistant Device associated with that browser. The device has the following entities:
|
|
|
|
- A `media_player` entitiy which will play sound through the browser.
|
|
- A `light` entity will turn the screen on or off and controll the brightness if you are using [Fully Kiosk Browser](https://www.fully-kiosk.com/) (FKB). If you are not using FKB the function will be simulated by covering the screen with a black (or semitransparent) box.
|
|
- A motion `binary_sensor` which reacts to mouse and/or keyboard activity in the Browser. In FKB this can also react to motion in front of the devices camera.
|
|
- A number of `sensor` and `binary_sensor` entities providing different bits of information about the Browser which you may or may not find useful.
|
|
|
|
Registering a browser also enables it to act as a target for Browser Mod _services_.
|
|
|
|
### BrowserId
|
|
|
|
This box lets you set the `BrowserID` for the current _Browser_.
|
|
Note that it is possible to assign the same `BrowserID` to several browsers, but unpredictable things _may_ happen if several of them are open at the same time.
|
|
There may be benefits to using the same `BrowserID` in some cases, so you'll have to experiment with what works for you.
|
|
|
|
### Enable camera
|
|
|
|
If your device has a camera, this will allow it to be forwarded as a `camera` entity to Home Assistant.
|
|
|
|
## Registered Browsers
|
|
|
|
This section shows all currently registered _Browsers_ and allows you to unregister them. This is useful e.g. if a `BrowserID` has changed or if you do not have access to a device anymore.
|
|
|
|
### Register CAST browser
|
|
|
|
If you are using [Home Assistant Cast](https://www.home-assistant.io/integrations/cast/#home-assistant-cast) to display a lovelace view on a Chromecast device it will get a BrowserID of "`CAST`". Since you can't access the Browser Mod config panel from the device, clicking this button will register the `CAST` browser. Most Browser Mod services will work under Home Assistant Cast.
|
|
|
|
## Frontend Settings
|
|
|
|
This section is for settings that change the default behavior of the Home Assistant frontend.
|
|
|
|
Each setting has three levels, _Global_, _Browser_ and _User_.
|
|
|
|
- Changes made on the _Global_ tab will be applied for everyone on every browser.
|
|
- Changes made on the _Browser_ tab will be applied for this _Browser_. The settings here override any _Global_ settings.
|
|
- Changes made on the _User_ tab will be applied for the user you're currently logged in as - on any device. The settings here override any _Global_ or _Browser_ settings.
|
|
|
|
Note that if a setting is set at a lower level but _cleared_ on a higher, it is not _undone_. It's just not overridden.
|
|
|
|
Also note that _User_ level settings can only be made when logged in as the user in question, and that the Browser Mod configuration panel is only available to administrators. If you need to change a setting for a non-admin user, you will need to temporarily make them admin for the setup, and then un-admin them.
|
|
|
|
### Favicon template
|
|
|
|
This allows you to set and dynamically update the favicon of the browser tab/window. I.e. the little icon next to the page title. Favicons can be .png or .ico files and should be placed in your `<config>/www` directory. The box here should then contain a jinja [template](https://www.home-assistant.io/docs/configuration/templating/) which resolves to the path of the icon with `<config>/www/` replaced by `/local/` (see [Hosting files](https://www.home-assistant.io/integrations/http/#hosting-files)).
|
|
|
|
> Ex:
|
|
>
|
|
> ```jinja
|
|
> {% if is_state("light.bed_light", "on") %}
|
|
> /local/icons/green.png
|
|
> {% else %}
|
|
> /local/icons/red.png
|
|
> {% endif %}
|
|
> ```
|
|
|
|
Note that this _only_ applies to the current favicon of the page, not any manifest icons such as the loading icon or the icon you get if you save the page to your smartphones homescreen. For those, please see the [hass-favicon](https://github.com/thomasloven/hass-favicon) integration.
|
|
|
|
### Title template
|
|
|
|
This allows you to set and dynamically update the title text of the browser tab/window by means on a Jinja [template](https://www.home-assistant.io/docs/configuration/templating/).
|
|
|
|
> Ex:
|
|
>
|
|
> ```jinja
|
|
> {{ states.persistent_notification | list | count}} - Home Assistant
|
|
> ```
|
|
|
|
### Hide Sidebar
|
|
|
|
This will hide the sidebar wit the navigation links. You can still access all the pages via normal links.
|
|
|
|
> Tip: add `/browser-mod` to the end of your home assistant URL when you need to turn this off again...
|
|
|
|
### Hide header
|
|
|
|
This will hide the header bar. Completely. It does not care if there are useful navigation links there or not. It's gone.
|
|
|
|
> Tip: See the big yellow warning box at the top of this card? For some reason, it seems to be really easy to forget you turned this on. Please do not bother the Home Assistant team about the header bar missing if you have hidden it yourself. Really, I've forgotten multiple times myself.
|
|
|
|
### Sidebar order
|
|
|
|
Did you know that you can change the order and hide items from the sidebar? To do so, either go into your profile settings at the bottom left and click "Change the order and hide items from the sidebar", or click and hold on the "Home Assistant" text at the top of the sidebar.
|
|
|
|
Normally, the order and hidden items only applies to the current device, but this will make it persistent according to the levels described above.
|
|
|
|
### Default dashboard
|
|
|
|
Like the Sidebar order, the default dashboard (the page shown when you simply access `https://<your home assistant url>/` with nothing after the `/`) can be set in your profile settings but only applies to the current device. This fixes that.
|
|
|
|
# Browser Mod Services
|
|
|
|
Browser Mod has a number of services you can call to cause things to happen in the target Browser.
|
|
|
|
<details><summary>Reading guide</summary>
|
|
Service parameters are described using the following conventions:
|
|
|
|
- `<type>` describes the type of a parameter, e.g.
|
|
|
|
- `<string>` is a piece of text
|
|
- `<number>` is a number
|
|
- `<TRUE/false>` means the value must be either `true` or `false` with `true` being the default
|
|
- `<service call>` means a full service call specification. Note that this can be any service, not just Browser Mod services
|
|
- `<Browser IDs>` is a list of BrowserIDs
|
|
|
|
- Square brackets `[ ]` indicate that a parameter is optional and can be omitted.
|
|
|
|
### `<service call>`
|
|
|
|
A service call is a combination of a service and it's data:
|
|
|
|
Ex, a `<service call>` for `browser_mod.more_info` with `light.bed_light` as entity:
|
|
|
|
```yaml
|
|
service: browser_mod.more_info
|
|
data:
|
|
entity: light.bed_light
|
|
```
|
|
|
|
Seems obvious, hopefully.
|
|
|
|
</details>
|
|
|
|
## Calling services
|
|
|
|
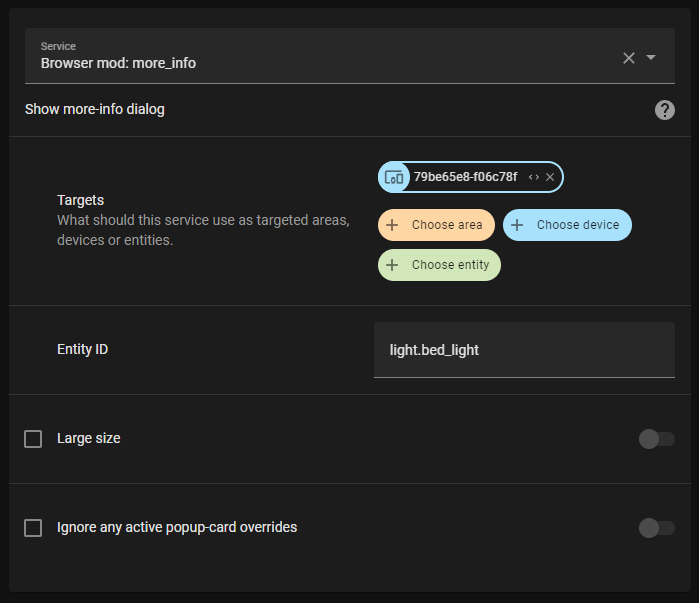
Services can be called from the backend using the normal service call procedures. Registered Browsers can be selected as targets through their device:
|
|
|
|
|
|
In yaml, the BrowserID can be used for targeting a specific browser:
|
|
|
|
```yaml
|
|
service: browser_mod.more_info
|
|
data:
|
|
entity: light.bed_light
|
|
browser_id:
|
|
- 79be65e8-f06c78f
|
|
```
|
|
|
|
If no target or `browser_id` is specified, the service will target all registerd Browsers.
|
|
|
|
To call a service from a dashboard use the call-service [action](https://www.home-assistant.io/dashboards/actions/) or the special action `fire-dom-event`:
|
|
|
|
```yaml
|
|
tap_action:
|
|
action: fire-dom-event
|
|
browser_mod:
|
|
service: browser_mod.more_info
|
|
data:
|
|
entity: light.bed_light
|
|
```
|
|
|
|
Services called via `fire-dom-event` or called as a part of a different service call will (by default) _only_ target the current Browser (even if it's not registered).
|
|
|
|
Finally, in service calls via `fire-dom-event` or as part of a different service call, the following a parameter `browser_id` with the value `THIS` will be replaced with the current Browsers browser ID.
|
|
|
|
Ex:
|
|
|
|
```yaml
|
|
tap_action:
|
|
action: fire-dom-event
|
|
browser_mod:
|
|
service: script.print_clicking_browser
|
|
data:
|
|
browser_id: THIS
|
|
```
|
|
|
|
with the script:
|
|
|
|
```yaml
|
|
script:
|
|
print_clicking_browser:
|
|
sequence:
|
|
- service: system_log.write
|
|
data:
|
|
message: "Button was clicked in {{browser_id}}"
|
|
```
|
|
|
|
Will print `"Button was clicked in 79be65e8-f06c78f" to the Home Assistant log.
|
|
|
|
## Services
|
|
|
|
### `browser_mod.navigate`
|
|
|
|
```yaml
|
|
service: browser_mod.navigate
|
|
data:
|
|
path: <string>
|
|
[browser_id: <Browser IDs>]
|
|
```
|
|
|
|
This will point the browser to the Home Assistant path given as `path`.
|
|
E.g. `/lovelace/`, `/my-dashboard/bedroom`, `/browser_mod/`, `/config/devices/device/20911cc5a63b1caafa2089618545eb8a`...
|
|
|
|
### `browser_mod.refresh`
|
|
|
|
```yaml
|
|
service: browser_mod.refresh
|
|
data:
|
|
[browser_id: <Browser IDs>]
|
|
```
|
|
|
|
This will reload the current page.
|
|
|
|
### `browser_mod.more_info`
|
|
|
|
```yaml
|
|
service: browser_mod.more_info
|
|
data:
|
|
entity: <string>
|
|
[large: <true/FALSE>]
|
|
[ignore_popup_card: <true/FALSE>]
|
|
[browser_id: <Browser IDs>]
|
|
```
|
|
|
|
This will show the more-info dialog for `entity`. \
|
|
If `large` is true it will be displayed wider (as if you had clicked the name in the dialog). \
|
|
If `ignore_popup_card` is true the more-info dialog will be shown even if it is currently overriden by a popup-card.
|
|
|
|
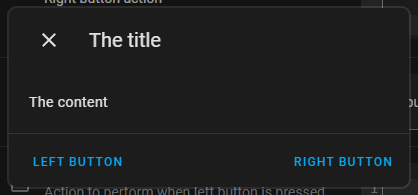
### `browser_mod.popup`
|
|
|
|
```yaml
|
|
service: browser_mod.popup
|
|
data:
|
|
[title: <string>]
|
|
content: <string / Dashboard card configuration>
|
|
[size: <NORMAL/wide/fullscreen>]
|
|
[right_button: <string>]
|
|
[right_button_action: <service call>]
|
|
[left_button: <string>]
|
|
[left_button_action: <service call>]
|
|
[dismissable: <TRUE/false>]
|
|
[dismiss_action: <service call>]
|
|
[timeout: <number>]
|
|
[timeout_action: <service call>]
|
|
[style: <string>]
|
|
[browser_id: <Browser IDs>]
|
|
```
|
|
|
|
This will display a popup dialog. \
|
|
`content` may be either some text (including HTML) or a dashboard card configuration. \
|
|
If `size` is `wide` or `fullscreen` the card will be displayed wider or covering the entire window. \
|
|
`right_button` and `left_button` specify the text of two action buttons. \
|
|
When either action button is clicked, the dialog is closed and the service specified as `right_button_action` or `left_button_action` is called. \
|
|
If `dismissable` is false, the dialog cannot be closed by the user without clicking either action button. If it is true and the dialog is dismissed, `dismiss_action` is called. \
|
|
If `timeout` is specified the dialog will close automatically after `timeout` milliseconds, at which point `timeout_action` will be called. \
|
|
Finally, `style` lets you specify some CSS styles to apply to the dialog itself (to style a card in the dialog check out [card-mod](https://github.com/thomasloven/lovelace-card-mod))
|
|
|
|
Note that any Browser Mod services performed as `_action`s here will be performed only on the same Browser as initiated the action unless `browser_id` is given.
|
|
|
|
Ex:
|
|
|
|
```yaml
|
|
service: browser_mod.popup
|
|
data:
|
|
title: The title
|
|
content: The content
|
|
right_button: Right button
|
|
left_button: Left button
|
|
```
|
|
|
|
|
|
|
|
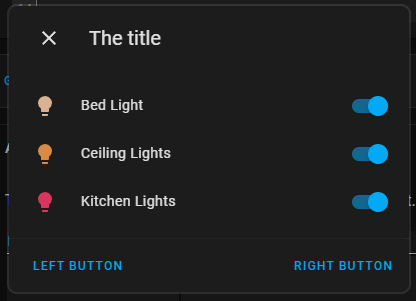
```yaml
|
|
service: browser_mod.popup
|
|
data:
|
|
title: The title
|
|
right_button: Right button
|
|
left_button: Left button
|
|
content:
|
|
type: entities
|
|
entities:
|
|
- light.bed_light
|
|
- light.ceiling_lights
|
|
- light.kitchen_lights
|
|
```
|
|
|
|
|
|
|
|
```yaml
|
|
service: browser_mod.popup
|
|
data:
|
|
content: Do you want to turn the light on?
|
|
right_button: "Yes"
|
|
left_button: "No"
|
|
right_button_action:
|
|
service: light.turn_on
|
|
data:
|
|
entity_id: light.bed_light
|
|
left_button_action:
|
|
service: browser_mod.popup
|
|
data:
|
|
title: Really?
|
|
content: Are you sure?
|
|
right_button: "Yes"
|
|
left_button: "No"
|
|
right_button_action:
|
|
service: browser_mod.popup
|
|
data:
|
|
content: Fine, live in darkness.
|
|
dismissable: false
|
|
title: Ok
|
|
timeout: 3000
|
|
left_button_action:
|
|
service: light.turn_on
|
|
data:
|
|
entity_id: light.bed_light
|
|
```
|
|
|
|

|
|
|
|
### `browser_mod.close_popup`
|
|
|
|
```yaml
|
|
service: browser_mod.close_popup
|
|
data:
|
|
[browser_id: <Browser IDs>]
|
|
```
|
|
|
|
This will close any currently open popup or more-info dialogs.
|
|
|
|
### `browser_mod.sequence`
|
|
|
|
```yaml
|
|
service: browser_mod.sequence
|
|
data:
|
|
sequence:
|
|
- <service call>
|
|
- <service call>
|
|
- ...
|
|
[browser_id: <Browser IDs>]
|
|
```
|
|
|
|
This will perform the listed servie calls one after the other.
|
|
|
|
Note that if `browser_id` is omitted in the service calls listed in `sequence` the services will be performed on the Browser that's targeted as a whole rather than all browsers.
|
|
|
|
### `browser_mod.delay`
|
|
|
|
```yaml
|
|
service: browser_mod.delay
|
|
data:
|
|
time: <number>
|
|
[browser_id: <Browser IDs>]
|
|
```
|
|
|
|
This will wait for `time` millliseconds. It's probably most useful as part of a `browser_mod.sequence` call...
|
|
|
|
### `browsermod.console`
|
|
|
|
```yaml
|
|
service: browser_mod.console
|
|
data:
|
|
message: <string>
|
|
[browser_id: <Browser IDs>]
|
|
```
|
|
|
|
This will print `message` to the console of the target Browser.
|
|
|
|
### `browsermod.javascript`
|
|
|
|
```yaml
|
|
service: browser_mod.console
|
|
data:
|
|
code: <string>
|
|
[browser_id: <Browser IDs>]
|
|
```
|
|
|
|
This will run the arbitrary javascript `code` in the target Browser.
|
|
|
|
Only use this one if you know what you're doing.
|
|
|
|
|
|
# Popup card
|
|
|
|
Add a popup card to a lovelace view (via the GUI) and it will override the more-info dialog for the given entity. Try it. More info to come.
|
|
|
|
# Browser Player
|
|
|
|
---
|
|
|
|
<a href="https://www.buymeacoffee.com/uqD6KHCdJ" target="_blank"><img src="https://www.buymeacoffee.com/assets/img/custom_images/white_img.png" alt="Buy Me A Coffee" style="height: auto !important;width: auto !important;" ></a>
|