259 lines
8.7 KiB
Markdown
259 lines
8.7 KiB
Markdown
browser\_mod
|
|
============
|
|
|
|
[](https://github.com/custom-components/hacs)
|
|
|
|
A Home Assistant integration to turn your browser into a controllable entity - and also an audio player.
|
|
|
|
## Example uses
|
|
|
|
- Make the camera feed from your front door pop up on the tablett in your kitchen when someone rings the doorbell.
|
|
- Have a message pop up on every screen in the house when it's bedtime.
|
|
- Make the browser on your workstation switch to a specific tab when the kitchen light is on after midnight
|
|
- Play a TTS message on your work computer when the traffic sensor tells you it's time to go home.
|
|
|
|
# Installation instructions
|
|
|
|
**NOTE: This integration requires Home Assistant version 0.95 or later**
|
|
|
|
- Copy the contents of `custom_components/browser_mod/` to `<your config dir>/custom_components/browser_mod/`.
|
|
|
|
- Add the following to your `configuration.yaml`:
|
|
|
|
```yaml
|
|
browser_mod:
|
|
```
|
|
|
|
- Restart Home Assistant
|
|
|
|
# Usage
|
|
|
|
## Devices
|
|
The most important concept of `browser_mod` is the *device*.
|
|
|
|
A *device* is a machine-browser combination identified by a unique `deviceID`. The `deviceID` is randomly generated and may look like `ded3b4dc-abedd098`.
|
|
|
|
- Chrome on your desktop and Chrome on your laptop are two different *devices*.
|
|
- Chrome on your laptop and Safari on your laptop are two different *devices*.
|
|
- Two tabs in Firefox on the same computer is one *device*.
|
|
- Two windows in Edge on the same computer is one *device*.
|
|
|
|
In the two latter cases, the last loaded tab/window will be the *active* one.
|
|
|
|
Note: Incognito mode will generate a new `deviceID` and thus a new *device* every time it's started.
|
|
|
|
### Aliases
|
|
Since the deviceID can be a bit hard to remember for devices you use often, you can specify an alias in `configuration.yaml`
|
|
|
|
```yaml
|
|
browser_mod:
|
|
devices:
|
|
99980b13-dabc9563:
|
|
name: Arrakis
|
|
d2fc860c-16379d23:
|
|
name: dashboard
|
|
```
|
|
This binds the *aliases* `Arrakis` to `99980b13-dabc9563` and `dashboard` to `d2fc860c-16379d23`.
|
|
|
|
Note: Aliases must be unique.
|
|
|
|
## media\_player
|
|
Once `browser_mod` is installed, loading up your Home Assistant frontend on a new *device* will create a new `media_player` device.
|
|
|
|
Any sound played on this media player will be played by the *device*.
|
|
|
|
The `media_player` entity also has some extra attributes presenting the current state of the *device*.
|
|
|
|
| attribute | content |
|
|
| --- | --- |
|
|
| `path` | The currently displayed path on the *device*. |
|
|
| `visibility` | Whether the frontend is currently visible on the *device*. |
|
|
| `userAgent` | The User Agent of the associated browser. |
|
|
| `currentUser` | The user currently logged in on the *device*. |
|
|
| 'blackout' | Whether the view on the *device* is currently blacked out (see below). |
|
|
|
|
**NOTE: Because apple is apple; on iOS you need to touch the screen once after loading the frontend before any playback will work.**
|
|
|
|
## `browser_mod.command` service
|
|
|
|
Call the `browser_mod.command` service to control your *device* in various ways.
|
|
|
|
All service calls have two parameters in common, `command` which is the command to execute, and `deviceID` which is a list of *devices* to execute the command on. If `deviceID` is omitted, the command will be executed on **all** currently connected *devices*.
|
|
|
|
`deviceID` may also contain aliases, and there's a special alias named `this` which will evaluate to the *device* from which a command was initiated (if from the frontend).
|
|
|
|
### debug
|
|
|
|
```
|
|
service: browser_mod.command
|
|
service_data:
|
|
command: debug
|
|
```
|
|
|
|
Display a popup with the deviceID *and* a javascript allert with the deviceID on all connected *devices*.
|
|
|
|
### set-theme
|
|
|
|
```
|
|
service: browser_mod.command
|
|
service_data:
|
|
command: set-theme
|
|
theme: clear_light
|
|
```
|
|
|
|
will set the current theme to `clear_light` on all devices.
|
|
|
|
### navigate
|
|
```
|
|
service: browser_mod.command
|
|
service_data:
|
|
command: navigate
|
|
navigation_path: /lovelace/1
|
|
deviceID:
|
|
- ded3b4dc-abedd098
|
|
```
|
|
|
|
will open your second lovelace view on just the *device* `ded3b4dc-abedd098`.
|
|
|
|
Note: `navigation_path` does not have to be a lovelace path. All paths in Home Assistant works. (E.g. `/states`, `/dev-info`, `/map`)
|
|
|
|
### more-info
|
|
```
|
|
service: browser_mod.command
|
|
service_data:
|
|
command: more-info
|
|
entity_id: camera.front_door
|
|
deviceID:
|
|
- ded3b4dc-abedd098
|
|
- dashboard
|
|
```
|
|
|
|
will show the more-info dialog of `camera.front_door` on the *devices* `ded3b4dc-abedd098` and `dashboard`.
|
|
|
|
The optional parameter `large: true` will make the popup wider.
|
|
|
|
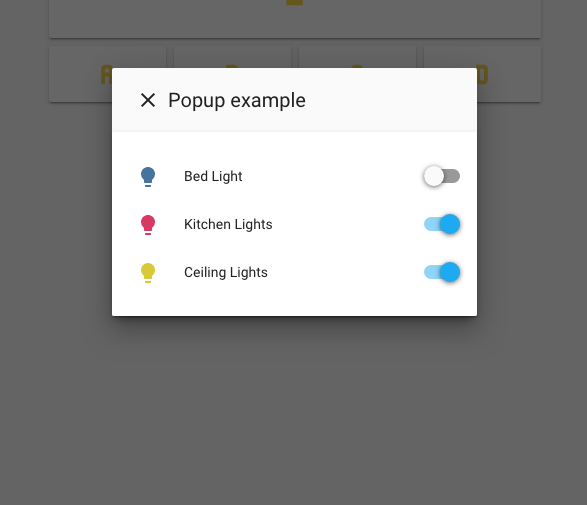
### popup
|
|
```
|
|
service: browser_mod.command
|
|
service_data:
|
|
command: popup
|
|
title: Popup example
|
|
card:
|
|
type: entities
|
|
entities:
|
|
- light.bed_light
|
|
- light.kitchen_lights
|
|
- light.ceiling_lights
|
|
deviceID:
|
|
- this
|
|
```
|
|
|
|
will display the specified `entities` card as a popup on the current device.
|
|
|
|
|
|
|
|
The optional parameter `large: true` will make the popup wider.
|
|
The optional parameter `style:` will apply css style options to the popup.
|
|
The optional parameter `auto_close: true` will make the popup close automatically when the mouse is moved or a key is pressed on the keyboard. This also removes the header bar.
|
|
|
|
Ex:
|
|
```yaml
|
|
style:
|
|
border-radius: 20px
|
|
--ha-card-border-radius: 20px
|
|
--ha-card-background: red
|
|
```
|
|
|
|
Note: Sometimes this doesn't work if the *device* is not currently displaying a lovelace path. I'm looking into that...
|
|
|
|
### close-popup
|
|
```
|
|
service: browser_mod.command
|
|
service_data:
|
|
command: close-popup
|
|
```
|
|
|
|
will close all more-info dialogs and popups that are open on all connected *devices*.
|
|
|
|
### blackout
|
|
```
|
|
service: browser_mod.command
|
|
service_data:
|
|
command: blackout
|
|
```
|
|
|
|
Will cover the entire window (or screen if in full screen mode) with black.
|
|
Moving the mouse, touching the screen or pressing any key will restore the view.
|
|
|
|
Note: This will *not* turn off your screen backlight. Most screens will still emit light in a dark room.
|
|
|
|
### no-blackout
|
|
```
|
|
service: browser_mod.command
|
|
service_data:
|
|
command: no-blackout
|
|
```
|
|
|
|
Remove a blackout.
|
|
|
|
### lovelace-reload
|
|
```
|
|
service: browser_mod.command
|
|
service_data:
|
|
command: lovelace-reload
|
|
```
|
|
|
|
Refreshes the lovelace config. Same as clicking "Refresh" in the top right menu in lovelace.
|
|
|
|
|
|
## `browser-player` card
|
|
|
|
To control the playback in the current *device*, `browser_mod` includes a custom lovelace card. Just add
|
|
|
|
```yaml
|
|
type: custom:browser-player
|
|
```
|
|
|
|
anywhere in your lovelace configuration.
|
|
|
|
The player card also displays the `entityID`. Click it to select, so you can copy it.
|
|
|
|

|
|
|
|
# Support
|
|
|
|
[Home Assistant community forum thread](https://community.home-assistant.io/t/browser-mod-turn-your-browser-into-a-controllable-device-and-a-media-player/123806)
|
|
|
|
# FAQ
|
|
|
|
### Does this replace lovelace-player and lovelace-browser-commander
|
|
Yes.
|
|
|
|
Some improvements
|
|
|
|
- With the backend support `browser_mod` does the same things as both of those, but better.
|
|
- Since `browser_mod` uses a service for executing commands rather than events, the commands can be easily triggered by any lovelace element which has a `tap_action` setting.
|
|
This actually means it pretty much replaces `popup-card` as well.
|
|
- `browser_mod` uses websockets to get immediate feedback from the *device* to the backend and much better tracking of disconnects.
|
|
- *Aliases*. 'nuff said.
|
|
- `browser_mod` works outside of `/lovelace`.
|
|
- This works even if the currently logged in user is not in the admin group.
|
|
|
|
### Does this replace lovelace-fullykiosk
|
|
It will, eventually.
|
|
|
|
### Can the deviceID be used to track me across the internet
|
|
|
|
No\*. The device is stored in your browsers localStorage - a data store which is sandboxed only to Home Assistant. That means only Home Assistant can access it. Furthermore, different Home Assistant installations cannot acces each others localStorage.
|
|
|
|
Some of [my lovelace plugins](https://github.com/thomasloven/hass-config/wiki/My-Lovelace-Plugins) use the device to do different things for different *devices*.
|
|
|
|
**\*: There is one exception. If you are using [Fully Kiosk Browser](https://www.ozerov.de/fully-kiosk-browser/), the deviceID is taken from the browser instead of being randomly generated. This deviceID will be the same for each website that asks for it.**
|
|
|
|
### How do I run commands from /dev-service?
|
|
|
|
`/dev-service` requires json-formated service data. There's an explanation on the differences between yaml and json [here](http://thomasloven.com/blog/2018/08/YAML-For-Nonprogrammers/).
|
|
|
|
---
|
|
<a href="https://www.buymeacoffee.com/uqD6KHCdJ" target="_blank"><img src="https://www.buymeacoffee.com/assets/img/custom_images/white_img.png" alt="Buy Me A Coffee" style="height: auto !important;width: auto !important;" ></a>
|